Installing Flexcom |
 
|
Installing Flexcom |
|
The program installation requires administrator privileges. If you do not have administrator rights on your machine, you should contact your Systems Administrator before attempting to install the software.
To install Flexcom, please perform the following steps:
1.Download the latest version of Flexcom
2.Save the ZIP file to a temporary folder on the hard drive, and unzip the contents.
3.Right click on 'InstallFlexcom.exe' and select 'Run as administrator' to launch the Setup Wizard.
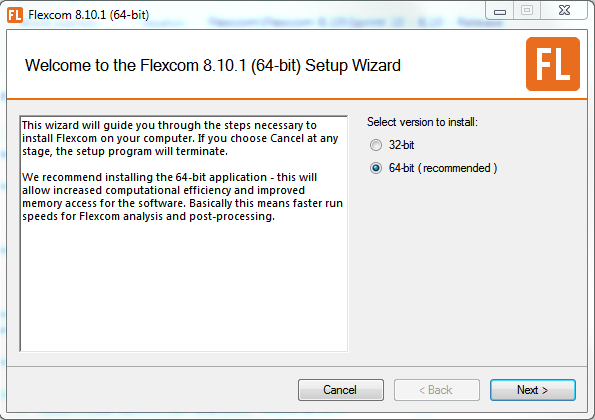
4.Select the correct version of Flexcom to suit your operating system, whether it is 32-bit or 64-bit. Most machines come with 64-bit operating systems as standard nowadays, so the majority of Flexcom users should opt for the latter to avail of increased computational efficiency and improved RAM access for the software.
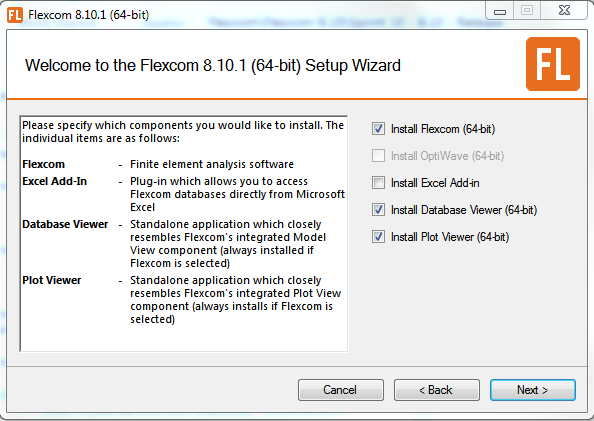
5.Select the components which you wish to install...
a.Flexcom
c.Database Viewer (a standalone application which closely resembles Flexcom's integrated Model View)
d.Plot Viewer (a standalone application which closely resembles Flexcom's integrated Plotting module)
6.Flexcom has dependencies on a number of other components, and each of these must be installed on your machine before you can proceed with the Flexcom installation. Click each of the install buttons in turn (and follow the subsequent installation instructions) until each component has been successfully installed. If a component is already present, the corresponding install button will appear greyed-out.
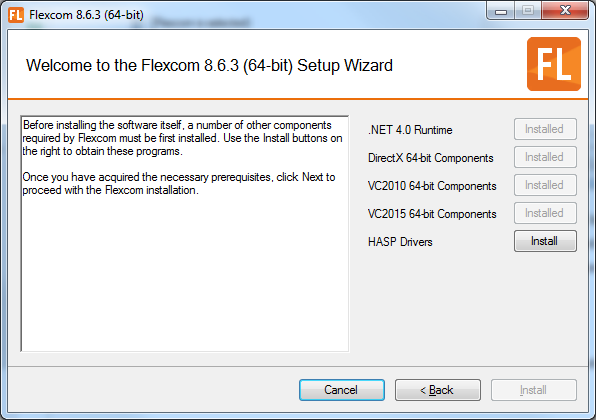
The vast majority of Flexcom installations run smoothly. Occasionally however, the installer cannot proceed past the prerequisites screen. Even after you have installed a particular component, the relevant button remains continuously enabled, and so the main installer cannot proceed any further. Should this happen, and you are sure that you have successfully installed all the dependencies, a useful workaround is to use the CTRL+ALT+N key combination to enable the 'Next' button. This will allow you to proceed directly to the next stage of the installation process. Note however that unless all the relevant components have been installed, Flexcom may not run properly afterwards.
7.Specify the location where you would like to store the set of illustrative examples which accompanies Flexcom.
8.Choose shortcut locations to quickly launch the software.
9.Specify the location where you would like to install the software executables on the hard drive.
10.Press confirm to proceed with the installation.
11.After the software installation has fully completed, you will need to store a license file (entitled 'MCScode') in your local Flexcom installation directory. The exact location will depend on the options selected during the installation process, but will typically be something like... "C:\Program Files\Wood\Flexcom\Version 2026.1.1\bin". If you have not already received your licence file, you should Contact Us.
If you are installing Flexcom on a range of computers (e.g. an IT technician performing a group update), you might like to perform a silent installation from the command line. Flexcom uses a standard installation procedure so many of the features which you would expect from a Windows installer pack are available. Typically you would append the /quiet switch to the command line so that the installer runs without displaying a user interface. In this case, no prompts, messages, or dialog boxes are displayed to the user. Assuming that the pre-requisite software packages have already been installed, and this will be typically be the case if the computer already has or had some version of Flexcom installed on it, then you can bypass the ‘InstallFlexcom.exe’ program and proceed directly to the ‘Flexcom.x64.msi’ file (which installs a 64-bit version of Flexcom).
Further information on command line options is available in this online article provided by Microsoft. Some of the key commands are as follows:
•/help Help option. The equivalent Windows Installer command-line option is /?.
•/quiet Quiet display option. The installer runs an installation without displaying a user interface. The equivalent Windows Installer command-line option is /qn. Examples:
omsiexec /package Application.msi /quiet
omsiexec /uninstall Application.msi /quiet
•/passive Passive display option. Similar to /quiet but the installer displays a progress bar to the user.
•/norestart Do not restart option. The installer never restarts the computer after the installation. The equivalent Windows Installer command line has REBOOT=ReallySuppress set on the command line.
•/forcerestart Always restart option. The installer restarts the computer after every installation. The equivalent Windows Installer command line has REBOOT=Force set on the command line.
•/promptrestart Prompt before restarting option. Displays a message that a restart is required to complete the installation and asks the user whether to restart the system now. You can't use this option with the /quiet option. The equivalent Windows Installer command line has REBOOTPROMPT="" set on the command line.
•/uninstall (product) Uninstall product option. Uninstalls a product. The equivalent Windows Installer command-line option is /x. Example:
o<Package>.msi | <ProductCode>
•/package (product) Install product option. Installs or configures a product. The equivalent Windows Installer command-line option is /I. Example:
o<Package>.msi | <ProductCode>