Python offers a useful means of extracting data from Flexcom results databases, given its ease of use, flexibility, and suitability for first-time programmers. The simplest way to use Python with Flexcom is to invoke the VBA functions which underpin Flexcom's Excel Add-in. Before studying this Python example, please refer firstly to the general article on installing and running Python.
To access the Flexcom's VBA post-processing functions, you must first create a “database access object”. The Python.NET library is a package which offers Python programmers integration with the .NET 4.0+ Common Language Runtime (CLR) on Windows. So this enables accessing the Excel Add-in functionality.
You must follow 7 steps to access the postprocessing functions and the database.
1.Import the sys module (built-in). See Line 1 in Figure 1.
2.Import the clr module (this is in Python.NET package). See Line 2 in in Figure 1.
3.Locate the Flexcom Excel Add-in file (FlexcomDatabaseAccess.dll) in your system and append it to the python path. Generally it will be in a location like: C:\Program Files (x86)\Wood\FlexcomExcelAddin\Version 2022.1.1. See Line 8 in in Figure 1.
4.The clr module features an AddReference function, requiring the name of the .dll file to be passed as an argument for access from Python. See Line 11 in Figure 1.
5.Now import the “DatabaseAccess” class from Flexcom module. See Line 13 in Figure 1.
6.Create a DatabaseAccess object (call it db). See Line 15 in Figure 1.
7.Assign the database path to a variable (call it databaseName). See Line 17 in in Figure 1.

Figure 1
Following this opening section of code, the Flexcom VBA functions are open to Python. Figure 2 shows the sample syntax of these functions. This shows the conceptual similarity between Excel Add-in functions and the Python calling functions. The argument types and calling order is the same in both cases.

Figure 2
This example shows how to generate a variety of statistical data using Database Access via Python, in a similar vein as already shown for Database Access via Excel VBA. The output from this approach is consistent with results generated from the corresponding VBA example. The relevant code is contained in the Python file entitled “element_stats.py”, which may be found in the "J - Specialised Examples\02 - Advanced Database Postprocessing\Python" sub-folder of your Flexcom examples directory.
Please note that “element_stats.py” will run using 32-bit Python only. This may be run from the command prompt, and the command would be something like the following:
•"C:\Users\firstname.lastname\AppData\Local\Programs\Python\Python312-32bit\python" "C:\Users\Public\Documents\Wood\Flexcom\Version 2022.1.1\Example Projects\J - Specialised Examples\02 - Advanced Database Postprocessing\Python\element_stats.py"
The initial 7 steps outlined above are necessary to create the database object and connect to the database.
The remaining code accesses the database for specific node and element related data, including effective tension and bending moment for each element, and evaluating the overall statistics.
Finally, all the data is printed to the console output and a CSV file is generated.
The basic code above creates a CSV file, but you may wish to create an Excel (XLSX) file, or indeed plot results. In this case, you will need access to modules which are not compatible with 32-bit Python. Hence the need to move to 64-bit Python.
Further data processing is contained in the additional Python file, “genExcelDF.py” file.
Please note that “genExcelDF.py” will run using 64-bit Python only. This may be run from the command prompt, and the command would be something like the following:
•"C:\Users\firstname.lastname\AppData\Local\Programs\Python\Python312-64bit\python" "C:\Users\Public\Documents\Wood\Flexcom\Version 2022.1.1\Example Projects\J - Specialised Examples\02 - Advanced Database Postprocessing\Python\genExcelDF.py"
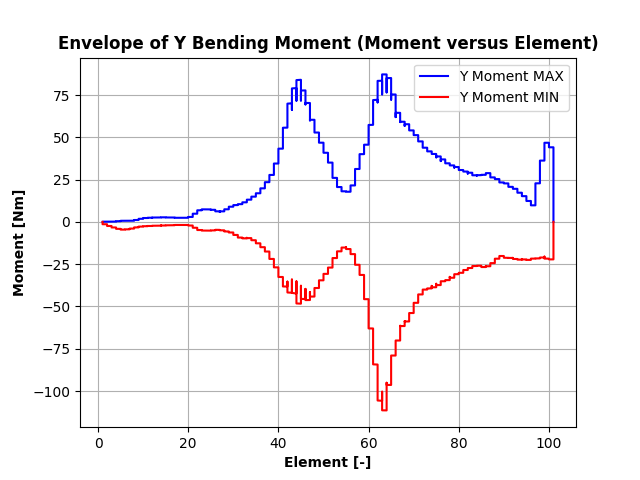
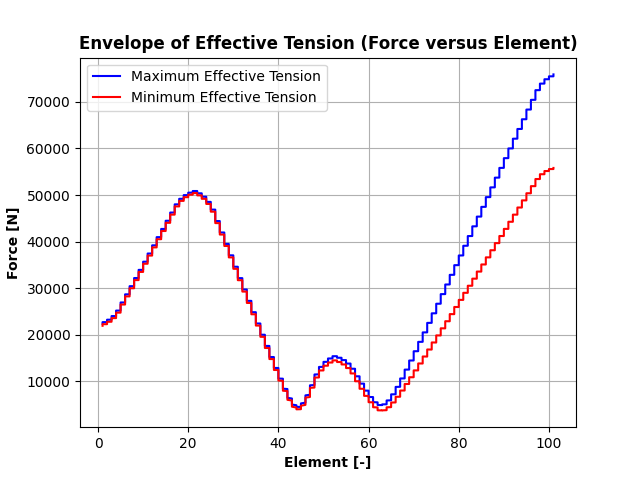
The “genExcelDF.py” code converts ‘pyout.csv’ to ‘pyout.xlsx’ (see Lines 19-25 in Figure 3) and plots the data in PNG format (see Lines 27-37 in Figure 3).

Figure 3
The code generates envelope plots of bending moment and effective tension as PNG images.

Bending Moment Envelope

Effective Tension Envelope