The Wind Field Generator app allows you to create wind data files which characterise the wind field as a function of space and time. It acts a user-friendly interface to the TurbSim software which does not have a Window-based GUI of its own. It allows you to run batches of TurbSim wind field simulations to generate all the wind data files required to support your design load cases. Several of Flexcom's wind turbine examples, such as Example L04 - IEA 15MW RWT, utilise TurbSim binary wind-field definitions files. With the file extension BTS (denoting Binary TurbSim), these files tend to be very large, so they are not supplied with Flexcom as it is not practical to include them in the installation package. Instead, you can readily generate the BTS files yourself with the Wind Field Generator app. For further information on TurbSim itself, refer to TurbSim Overview.
TurbSim V2.6.0 (May 2021) comes pre-installed with the Flexcom installation.
Follow these steps to generate your TurbSim wind data files:
1.Launch the tool via Tools->Model Building->Wind Field Generator.
2.Import a sample TurbSim input file via File->Import TurbSim Template. Likewise import a sample InflowWind input file via File->Import InflowWind Template. These files will act as a base templates for the generated IN and DAT files. Example L04 contains sample files if you do not already have any of your own. These may be found in a location such as 'C:\Users\Public\Documents\Wood\Flexcom\Version 2025.1.3\Example Projects\L - Wind Energy\04 - UMaineVolturnUS-IEA15MW\Data\Wind'. The contents of the template files are displayed on the TurbSim Template and InflowWind Template tabs which neatly colour the inputs for ease of viewing. You may also make edits to these template files here if you wish.

Sample TurbSim Template
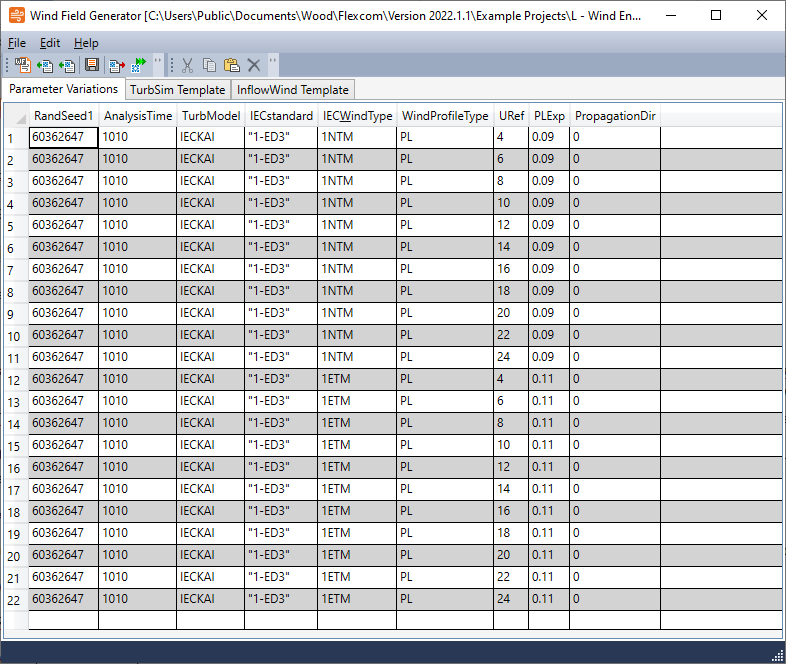
3.Define the required wind load cases on the Parameter Variations tab. The first line is automatically populated from the template file. The table supports copy and paste, so many users will prefer to set up their wind definitions in Excel, and then copy and paste the data into the wind field generator app. However this window is very quick to navigate once you know the basic keystrokes:
a.Use the arrow or TAB keys to move between cells.
b.To insert a new row, move to the bottom of the table, type data in a cell which you want to vary, and press ENTER. Data from the previous row is automatically copied into the new row, apart from the cell which you have just edited.
c.Rows may be selected using SHIFT+UP or SHIFT+DOWN.
d.CTRL+C and CTRL+V are used to copy and paste respectively.
e.Rows may be deleted using DEL.

Sample Parameter Variations
4.By default, the Parameter Variations tab displays only a small subset of all possible entries in the TurbSim input file. These include some of the most commonly used inputs (e.g. IEC turbulence type, mean wind speed etc.). However you can enable many more columns via File->Settings.
5.Define a naming convention for the generated files via File->Settings. As you may have a large number of wind files, it is important to assign each one a meaningful name for clarity. The File Name Pattern input gives you complete flexibility in terms of file names:
a.Plain text is applied unchanged to all files.
b.{ParameterName} allows you to reference parameter values.
c.{#} allows you to reference parameter row numbers.
d.If you need to insert a bracket, you can use {{ or }}.
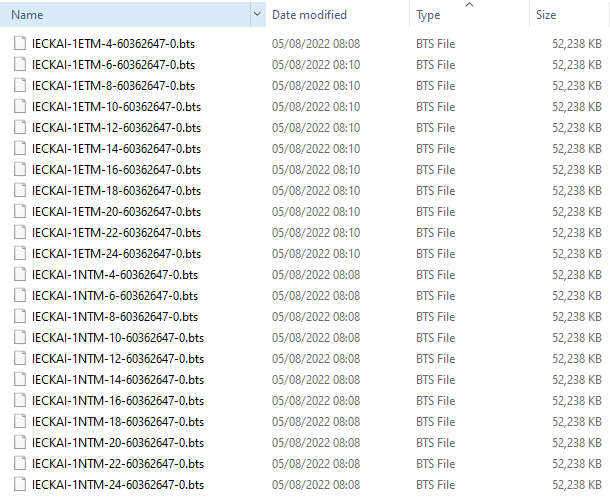
A sample naming convention might read as follows: {TurbModel}-{IEC_WindType}-{URef}-{RandSeed1}-{PropagationDir}. The resulting file names will reflect the main features of each wind profile (see sample BTS file names below).
6.Generate the wind files using File->Generate Input Files & Run TurbSim. You will be prompted for a folder where the generated files are to be stored. File generation is a two-step process:
a.TurbSim input files (*.IN) and corresponding InflowWind input files (*.DAT) are created. These are text files created by the Wind Field Generator app and typically produced in seconds.
b.TurbSim wind field data files (*.BTS) are created. These are large binary files produced by TurbSim, each one can take several minutes to produce.

Sample BTS Files
7.If you wish to QA the input files before running TurbSim, you can select File->Generate Input Files instead.
8.Save your project workspace before exiting the Wind Field Generator tool.
Example L04 - IEA 15MW RWT requires TurbSim BTS files to support the wind turbine simulations. You will find a sample project file for the app in the Data->Wind subfolder of the project, it is called L4-DLCs-Wind.wfproj. It is already pre-populated with the relevant wind speeds and turbulence models etc., so all you need to do is select the File->Generate Input Files and Run TurbSim command.